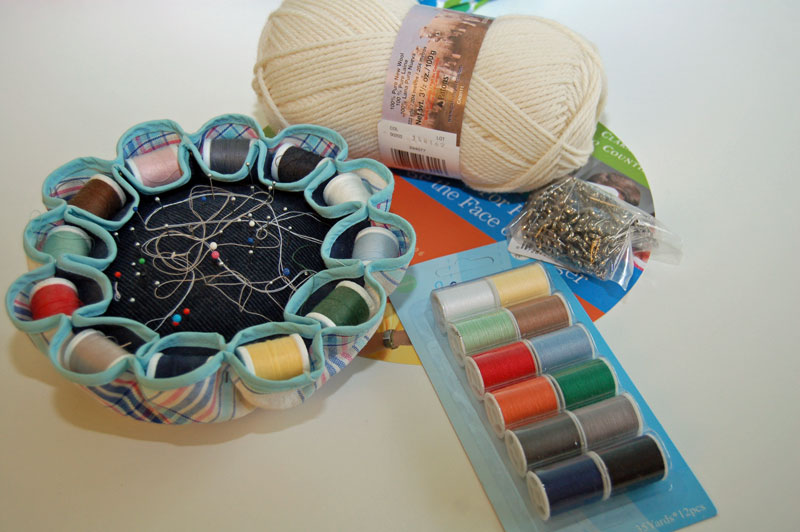
I used one my mother made me as a guide to make a few as gifts for Christmas. The plaid one in this picture is my kit, along with some supplies to make new ones.
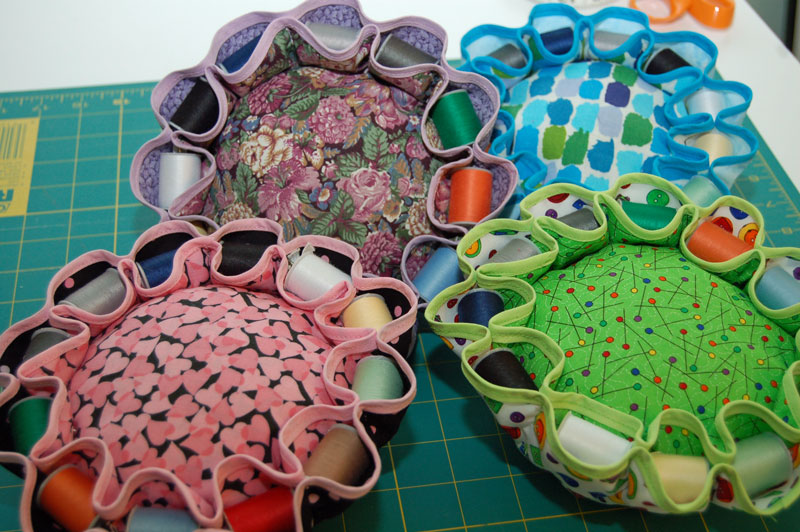
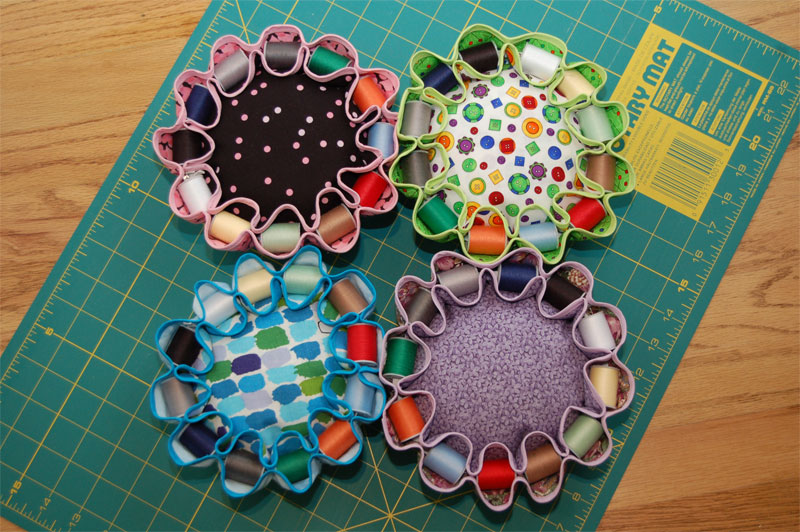
They’re quite easy to make and a good use for the novelty fat quarter fabrics you bought because you couldn’t resist the cute patterns or fun colors! I found the hardest part was choosing which fabrics to use because I have quite a nice little stash.
The pincushion is reversible so you can choose two compatible fabrics and switch between having one as the outside and one as the pincushion. The original pincushion my mom made had safety pins between each of the spools of thread, which are strung on elastic. This is fine, but if you reverse the pincushion the safety pins will all be on the outside. It’s tedious, but I chose to stitch each of the thread pockets in place, leaving a gap for the elastic.
Materials needed:
- Compass or one 10” and one 7” diameter plate or bowl to trace. Slightly smaller is ok, but to hold 12 small thread spools, the diameter should be no less than 9½” and the small plate should be 3” smaller in diameter than the large one.
- Cardboard to make a template (optional, but recommended if you're making more than one)
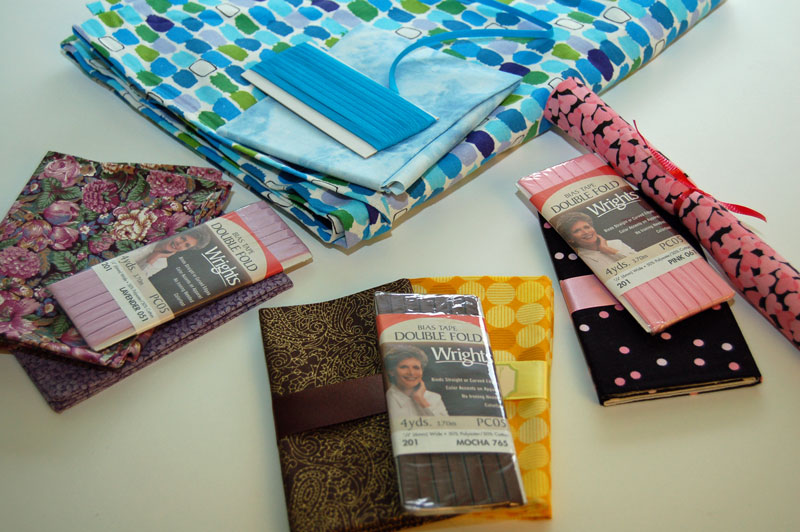
- 2 fat quarters or enough fabric to cut 4 10” circles
- 1 yard of ¼ inch double fold bias or ½ inch single fold, pressed in half
- 25 inches of ¼ inch or narrower flat elastic or thick elastic cord
- 12 small spools of thread. I found mine packaged as a set at Joanns. The spools used for this project are smaller than the small Coats and Clark thread, for example. I suppose you could alter the pattern to fit larger spools or the long spools of Mettler or Gutermann. The thread in the packaged set isn't the greatest but it works for mending.
- Cotton or wool stuffing or 50 grams of 100% wool yarn. Polyester stuffing dulls pins and needles. Yes, yarn works! I just stuffed a bunch of it inside and it worked just fine.
- 12 safety pins unless you’re sewing the pockets
- Tapestry needle if you’re sewing the pockets
Since I was making a few of these, I made a template out of card stock (actually, I recycled the cover from a booklet that was being thrown out). There are several marks to be made, so a template is a good idea.
To make the template, use the compass or trace the plate or bowl to draw the outer circle. Draw or trace the smaller circle inside the larger one. Now divide the circle into 12 sections. Tip: if you have a quilting ruler, it might be marked with a 30 or 60 degree line which you can use. Using a utility knife or scissors, cut slots on each of the 12 spokes. Cut the inner circle like a stencil so that the whole template doesn’t become distorted.
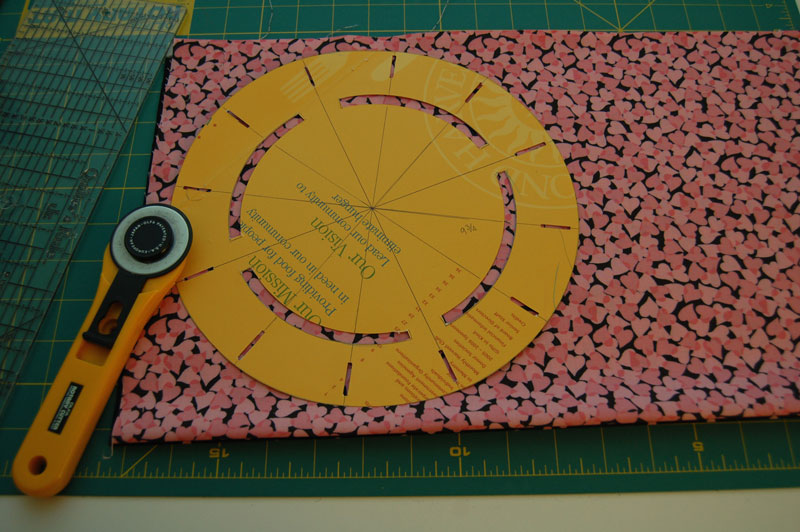
Use the template to cut 4 circles, 2 in each fabric if you are using contrasting fabrics. On one of the circles, mark the inner circle and each of the 12 spokes in chalk.
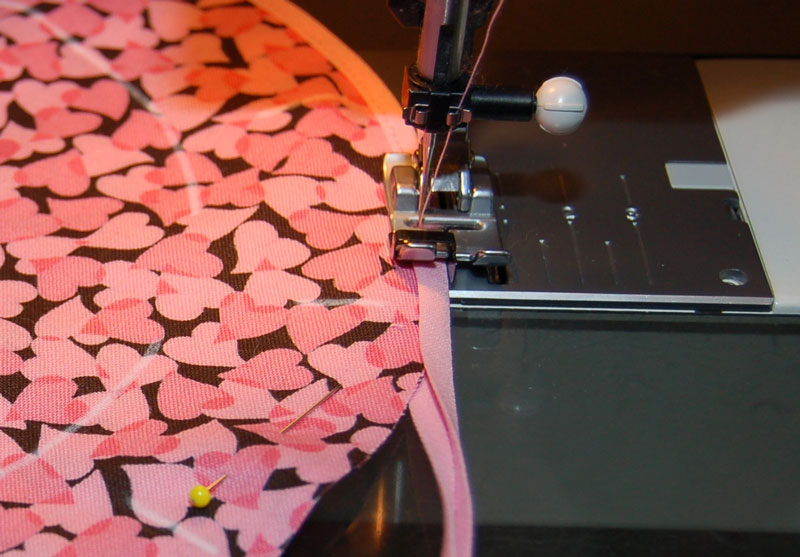
Match wrong sides together of the like fabrics and sew on the binding. I like to use my edge binding foot to sew on binding. I set the right edge of the binding against the metal edge of the foot and move the needle over to where I want to stitch. This works really well for skinny binding.
Now place both fabric circles together and stitch most of the way around the inner circle, leaving about a 2-2½” opening. Tip: start at one spoke and stitch around the circle to the 11th spoke. This will leave a gap and one spoke to sew after you’ve stuffed the center. If you plan to use safety pins between the threads, skip the next step and move on to the stuffing, otherwise, stitch the pockets. Stitch from the outer edge to the inner circle, but leave a gap for the elastic. You’ll have to do this in two steps, stitching one side of the gap and then the other.. Do not sew the 12th spoke opposite the opening.

Stuff the center with cotton fill or wool yarn. With a zipper foot, stitch the circle closed. Stitch the 12th spoke unless you’re using safety pins.
Now you’re ready to insert the thread spools.
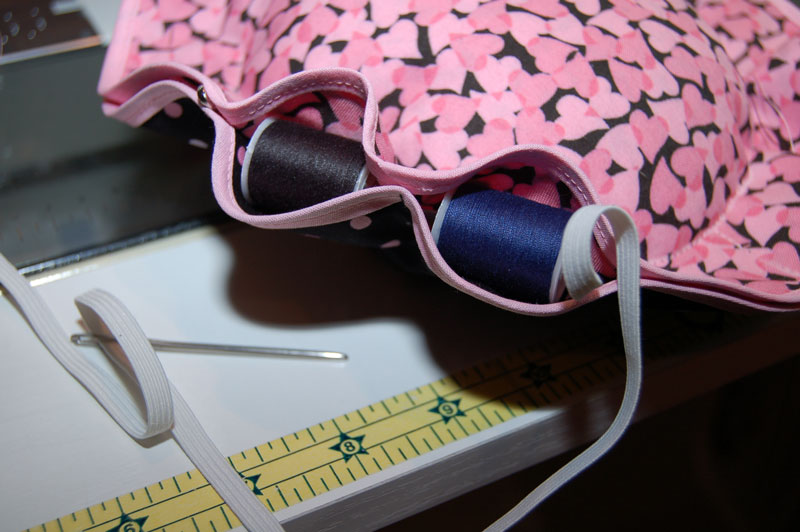
If you are using safety pins, thread the spools onto the elastic and use the safety pins to make the pockets, being careful to pin around the elastic and not into it. The elastic needs to be able to pull through all of the spools so you can snug them up. If you’ve stitched the pockets, attach a safety pin to the end of the elastic and thread through one of the pockets, then load the thread spools. When you get to the last one, pull the elastic to snug up the spools. Use the safety pin to attach the ends of the elastic and then trim the excess elastic. Tip: Make the black spool the first one you insert and the white spool the last one so they’re near the ends of the elastic and can be replaced if needed.
Those are absolutely adorable!! It almost makes me want to learn to sew, almost!
ReplyDeleteBy the way, did you get your crochet hook I browed at the Meet Up at Knitting Arts. It just hit me that I set it on the table in front of where you were sitting when I was done and didn't actually hand it to you.
Lisa
Ooh. I have one of those my mom bought me. Was it a 70's or 80's thing? Can't remember how long I've had mine. At least 20+ years!
ReplyDeleteThat is so cool! I bought one like that (non-reversible, though) at a senior center when I was in college, and it's my go-to pin cushion. I don't know if I can handle the binding, but I've got to try this! Thanks so much!
ReplyDeletei have never seen these before.they are so great!!! i might try and make one of these-thanks for sharing.
ReplyDeleteI have seen this pincushions but could never figure out how to make them. Thanks for sharing!
ReplyDeletejust a wonderful fun idea and such a clever design! Ideal as a gift too! Thanks Marianne
ReplyDeleteThis is the most nice thing for my daughter to make.Tanks lovely
ReplyDeleteCarra
Soooo cute. I am going to try making one this afternoon
ReplyDeleteThanks so much for sharing this with me - it is really great and would make a lovely gift.
ReplyDeleteNow that's an awesome pincushion .
ReplyDeleteThanks for sharing the pattern :)
Thanks for shsaring your pattern,this is an awesome pincushion.It`s really great.
ReplyDeleteWhen I was in high school, our home economics teacher taught us to make these...ummmm, that was 30 some odd years ago...Thanks for the memories... :-)
ReplyDeleteThis looks like a greta gift for any sewer/quilter. Thank you for the tutorial.
ReplyDeletewhat a neat idea, I think I will have to try making these!!
ReplyDeleteI have definitely seen these before, and have always wanted to make one, but just never learned how! Thanks for this tutorial! I cant wait to make at LEAST one.. but probably more for Christmas gifts!
ReplyDeleteI have never seen these before i do craft shows so i will have to make a few and give as Christmas gifts thanks for sharing this cool pattern:-)
ReplyDeleteThese have long been my favorite type of pin cushions. My grandma always made these for the women in the family. My step-mom had one from the time I was just a toddler.
ReplyDeleteI was just telling my step-mom before Christmas that I was in need of a good pin cushion, in case Grandma was still making them, and I got one for Christmas!
Pretty, pretty pretty adorable. really like them, though my threads are soo much longer it'd look odd.jeje
ReplyDeleteHey! My mom used to make these, too! :)
ReplyDeleteCould you possibly make a pdf pattern for us "non sew people' who have a terrible time making patterns?
ReplyDeleteIt would be very very helpful!
Thanks! :)
What a wonderful idea!!! I loved it!!!
ReplyDeleteThanks for sharing it with us!!!
I´m following you, too!!!
Have a great week!!!
Bê =D
http://artedetodotipo.blogspot.com
Its awesome.. I am a freshly new beginner in sewing things. Hehehe.. I'm asking permission to copy your picture to my blog. Thanks for sharing..
ReplyDeleteThese are absolutly adroable!!! Thenks so much for shareing! They're so easy to make it took me like an hour and a half to make them with time for the template..it's so awesome. I have a couple of craft shows I want to go to this fall, and I'd like to sell some if I could get your permission? I would give you the credit. They are to adorable not to show them off. I'll post a picture of mine on burda style soon under bluedragonfly. Can't wait to post them!!!
ReplyDeleteI'd also like to add a picture and your link to these cute pincushions to my blog. I am definitely going to make at least one for myself.
ReplyDeleteI am getting all my items together to start sewing this pattern, But i wanted to share with you all i found the small spools of thread at a dollars store for just $1.00 for 12 spools so go there before you pay the high dollars....
ReplyDeletesublime merci t es une fee bises jojo
ReplyDeleteHello,
ReplyDeleteThank you for your nice tutorial. I made mine in red and polkadots. I have a dutch blog but I made a link to your tutorial showing off my pincushion, I hope you don't mind. Again thank you for the clear explanations.
This is just too cute. I have been looking for a pattern for a pin cushion to give as a game prize at my soon-to be daughter-in-law's bridal shower. This is perfect! Thank you so much for posting
ReplyDeleteThank you!!!!
ReplyDeleteI know its many years ago but just found this website. Thanks for the beautiful idea!
ReplyDeleteThank you thank you thank you! I have been looking for this pattern/tutorial for a bit now. My mother's pin cushion was this exact one and I love the memory it has for me of her sewing for my sisters and myself. I have wanted to make one of my own and now I can! Just when I though I was going to have to go by memory (eek)I found your blog..So thank you once again :)!!
ReplyDeleteThank you thank you thank you! I have been looking for this pattern/tutorial for a bit now. My mother's pin cushion was this exact one and I love the memory it has for me of her sewing for my sisters and myself. I have wanted to make one of my own and now I can! Just when I though I was going to have to go by memory (eek)I found your blog..So thank you once again :)!!
ReplyDeleteSimply Great - thanks.
ReplyDeleteWow Lori, those are adorable! What a great little thing to have handy for quick mending fixes! And what a nice thing to come across on your blog now that my retractable measuring tape is all fixed -- maybe I'll make a little pocket in my pincushion sewing kit for the measuring tape too! Hmmmmm.....and my teeny scissors, little seam ripper.......! Thanks so much!
ReplyDelete--Destiny Hunt
These are amazing! I love it! I'm going to make mine out of felt because I don't have fat quarters.
ReplyDeleteAbsolutely delightful , what a crafty gem you are. Thanks for sharing. I am hotfooting to make one now.
ReplyDeleteI made these years ago as gifts and loved them. Then lost mine and the pattern. So glad to find this. When I made mine I threaded the spools with the same bias used on the edges. After running it through all the thread spools it was then tied in a bow. Much easier to handle than elastic and easier to remove spools.
ReplyDeleteSew a ring to the back for hanging!
ReplyDeleteThank you, Thank You, Thank You! Made one of these many years ago and have been looking for the pattern. Using them for gifts. I lost mine during all the moving and I was so glad to get your directions.
ReplyDeleteI've had the hardest time for years finding this pattern. It's very old and I first ran across it on the net--somewhere. Thank you for this on your site. I made one of these from some upholstery fabric and black velvet. Though it didn't work up right to place the threads in, it did result in a wonderfully large, vintage looking pin cushion. I do need to untie it and weight the bottom though, as it tends to get away from me. Thank you so much for this pattern. :)
ReplyDeleteMy grandma made these for all the "big girls" one year. I didn't make the cut as a "big girl" (was about 11 years old) and I've been sad about it ever since (going on 45 years.) I think I will make one for myself!
ReplyDelete