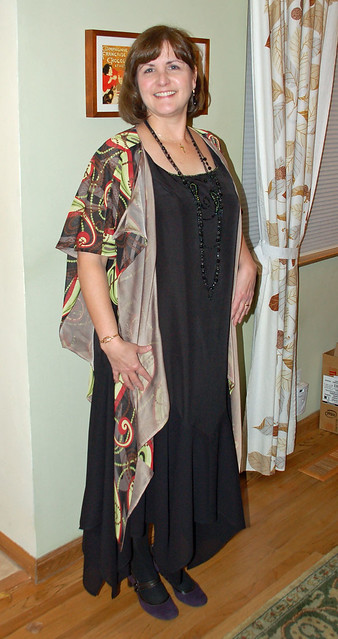
Every year I make my "Christmas party dress." This year my husband's company party had a 1920's Prohibition theme. I thought
Folkwear pattern #264, Monte Carlo Dress would be perfect because I don't think it's too costume-like to wear to other parties. I also wore it to my company holiday party.
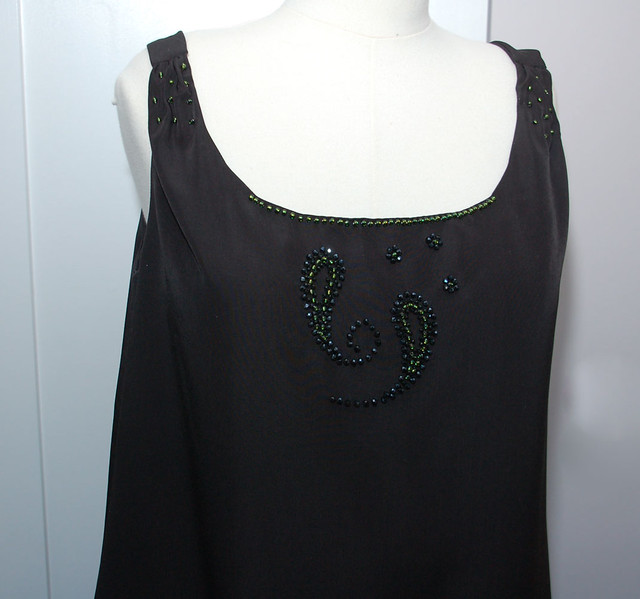
Here is it without the tunic:
Here it is with the tunic closed.
Here's a closeup of the beading I did on the front:
And finally, here's my pattern review:
Pattern Description:
Sleeveless, drop waist 1920's style dress with a handkerchief skirt. The dress pulls on over your head. There are two styles of over-tunics: one that is a simple pullover and one that crosses in the front that can be worn open or closed.
Pattern Sizing:
XS (30 1/2 - 31 1/2" bust) to XL (44-46" bust)
Did it look like the photo/drawing on the pattern envelope once you were done sewing with it?
Yes, I think it did, however I initially misunderstood how the skirt is constructed. The pattern comes with a lot of instruction and information about making the dress and mentions that layering fabrics for the skirt is a nice effect. When I saw that you cut out two large square pieces for the skirt I assumed those two pieces would be layered, but this is not the case. The two pieces are sewn together so that each square is one side of the skirt. I chose a thin skirt fabric, thinking it was going to be layered, but it was ok with one layer because the upper dress part does cover enough, and I wore black tights underneath.
Were the instructions easy to follow?
The dress is simple in style - there is only a facing for the top neck and sleeve edge and no zipper. The instructions are fairly easy to follow but don't include any seam finishing instructions. My polyester fabrics unraveled easily so I used the serger to finish the seam edges of the upper dress part and French seams for the lightweight tunic fabric.
The instructions say to press the dress hem at 1/4 inch, then turn up and sew close to the fold. It's difficult to iron such a small hem on polyester and there's quite a bit of dress hem, so I first sewed a 1/4 inch hem then folded it and sewed it again.
Other reviewers mention difficulty with the shoulder straps - I also had a bit of a struggle with them. The instructions are ok, it's just that the front strap is gathered a bit and there's more fabric to get in place. It took a few tries and some hand sewing to get the straps looking ok.
What did you particularly like or dislike about the pattern?
I really liked the fit and because of the style there was no need to wear body-shaping undergarments.
Fabric Used:
The top of the dress is a sueded polyester, and the dress skirt is a lightweight polyester crepe. Both the tunic outside and the lining are lightweight polyester fabrics as well.
Pattern alterations or any design changes you made:
I graded the pattern for the dress from a L for the top to an XL from the waist down. I sewed ribbons with snaps attached to them to the straps so that I could keep my bra straps hidden under the dress straps. I added beading to the front after the dress was made instead of before, as the instructions say to do. I wasn't sure what beading I wanted to do and wanted to wait to see the dress completed to get some inspiration. I didn't find it difficult to bead it afterwards.
Would you sew it again? Would you recommend it to others?
I probably won't make it again because I don't need more than one 20's style dress.
I gave this pattern a "Highly Recommend" because of the nice fit of the dress for many body types.
Conclusion:
The most difficult part of making this dress is cutting it out. The tunic and dress skirt have large pattern pieces, and the tunic is cut on the bias. I traced off an extra tunic front so that I could ensure I had the layout correct and had enough fabric for all 3 pieces. Take note of any directional fabric. The motifs on my fabric were already on the diagonal so on the bias they either ran vertically or horizontally. I chose to have them run vertically but had I not noticed this I could easily have made a mistake and mixed them, which would have been disastrous!
Completing the tunic was also a bit more work than I figured it would be. The sewing wasn't so hard because it's just straight lines, and even doing French seams wasn't difficult, just time consuming. But once the tunic was finished, it needed to be pressed. Even though a sample showed I wouldn't melt the fabric with the iron, at least right away, I was still fearful of ruining it, so I used a presscloth. But trying to get a slippery seam to behave under a presscloth is really hard! So I first pinned the seam allowance in place around the entire perimeter of the tunic. Then I held the iron about an inch above and let it get a good dose of steam. Then I removed the pins, put down the presscloth and pressed with the iron. Then I removed the presscloth and used a clapper. Tedious, but worth it to get a nicely pressed edge.